
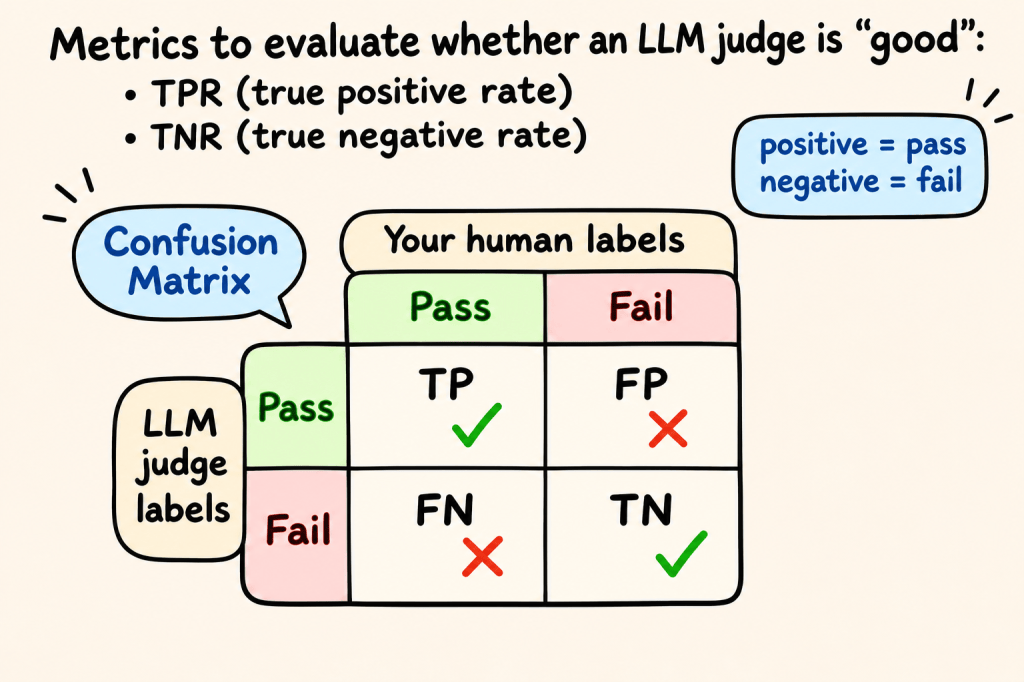
At first, the Confusion Matrix made me feel confused (pun 100% intended). Now it’s one of the first things I reach for when checking whether an LLM judge can be trusted.
Using an LLM as a judge means an LLM acts as your automated evaluator. A team can’t read every agent output, so the judge is a way to find likely problems across thousands of traces. You give the judge a set traces that humans have already labelled, and for each output it returns a pass or fail. Its job is to surface problems in your agent’s output at a scale humans can’t match.
The judge is a classifier, and no classifier is perfect. So the real question isn’t “is the judge right?” It’s “how much error am I comfortable with, and where does that error sit?” Naturally, human labellers make mistakes too, and that checking everything yourself costs time you may not have, so the question is how much error you can live with. The Confusion Matrix gives you a good indication of where the real errors are.
A simple example
Imagine a judge checking whether an answer cites a source from the knowledge base. Your team labels 100 traces, and 70 are genuine passes. The judge’s results look like this:
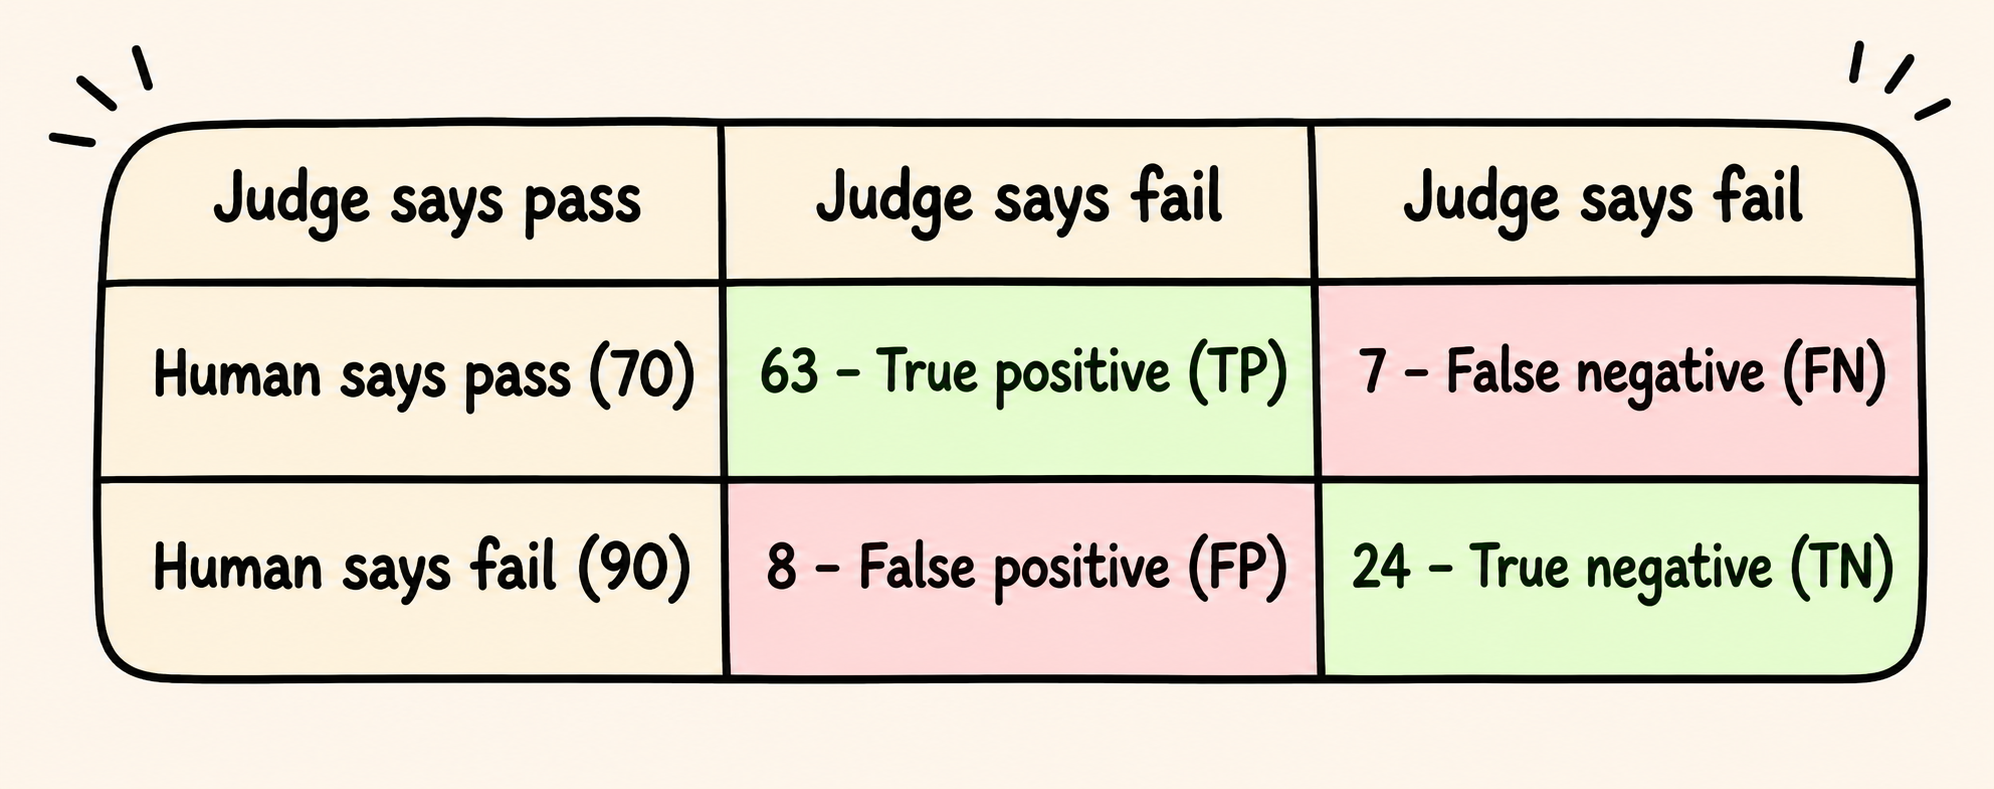
The human labels are the ground truth, and the judge is being compared against them:
- True Positive (TP): both the human and the judge say pass. This is what you want.
- False Negative (FN): the human says pass, the judge says fail. This is a false alarm, and if you have many of those, you can end up wasting time looking at an output that was fine.
- False Positive (FP): the human says fail, the judge says pass. This is a missed error, and it’s the one that ships to users.
- True Negative (TN): both say fail. The judge caught a real problem.
There are two main metrics for evaluating judges:
- True Positive Rate (TPR) = TP / (TP + FN) = 63 / 70 = 90%. Of the outputs humans passed, how many did the judge also pass? A low TPR means lots of false alarms. The goal is have TPR of close to 100%.
- True Negative Rate (TNR) = TN / (TN + FP) = 24 / 30 = 80%. Of the outputs humans failed, how many did the judge also fail? A low TNR means real errors are getting through. The share slipping through is 1 − TNR, here 20%.
Aim for a high TPR, since every false alarm wastes investigation time and erodes trust in the judge’s flags, but not 100%, because a judge that passes everything reaches that score while catching no errors. Full agreement with humans only shows that the judge matches your labellers, not that either is correct, because the human labels can be wrong too.
Why TNR matters most
If your goal is to improve quality, TNR is the metric to maximise as much as possible. Every missed error is a problem a user might hit. TPR still matters, because a judge that cries wolf on every trace will quickly get ignored by the engineers or PMs who have to investigate its flags.
Why not just look at accuracy?
Accuracy in this example is (63 + 24) / 100 = 87%. That looks healthy, but accuracy rewards agreeing with the majority. Suppose 90% of your traces are genuine passes. A judge that passes everything scores 90% accuracy and catches zero errors, with a TNR of 0%. When failures are rare, which is often the case in production, always check TNR alongside accuracy.
Reading the numbers
- Low TPR (say, 60%): the judge is too strict. This often means the criterion is broad or vague, so it penalises things humans accept. Tighten the criterion, add examples of genuine passes, or split it into narrower failure modes.
- Low TNR (say, 20%): the judge is too lenient and lets too many errors through. Add examples of the failure, make the criterion more specific, or add a separate check for that failure mode.
Improving the judge
Treat iterating on your LLM as judge like a loop:
- Split your labelled traces into a development set and a holdout set.
- Tune the judge’s prompt, criteria and few-shot examples on the development set.
- Measure TPR and TNR on the holdout set, which you only use for checking.
- Repeat. Aim to raise TNR without TPR collapsing.
Before you trust any of this, have two people label a sample of traces independently and check how often they agree. If your human labellers disagree, the matrix is measuring noise, not the judge.
Main learning point: A judge is only as good as the labels it’s checked against. Use the Confusion Matrix to see where the judge’s errors fall, and prioritise high TNR so that you can fix these through your prompts, before errors reach your users.
Related links for further learning:
- https://hamel.dev/blog/posts/llm-judge/#step-5-build-your-llm-as-a-judge-iteratively
- https://www.geeksforgeeks.org/machine-learning/confusion-matrix-machine-learning/
- https://medium.com/@sundarbee/understanding-confusion-matrix-evaluation-metrics-in-machine-learning-4b5cdc9ab4a4
- https://arize.com/docs/ax/evaluate/evaluators/llm-as-a-judge

